Menampilkan postingan yang diurutkan menurut relevansi untuk kueri jamie beck. Urutkan menurut tanggal Tampilkan semua postingan

Kamis, 03 Maret 2011

Three twisted buns

I'm excited to share another hair tutorial! You know those days when you want your hair to look pretty but you only have a minute? Well, my friend Caroline swears by this gorgeous set of three twisted buns ("like cinnamon rolls!" she says). So she came over to explain exactly how to do them, and the wonderful Jamie Beck took a few photographs. And guess what? They really were quick and easy.

Here are Caroline's steps, if you'd like to try them out...

1. This style is so easy, it's laughable. Day-old hair is best (which is true for most hairstyles, since it's easier to work with hair that has a little dirt in it).

2. Divide your hair into three equal parts and quickly spray each section with a little hairspray to help give it hold. Let the hairspray set for a couple seconds, and then lightly comb it out.

3. Take the section on your right side, and twist your hair all the way down to the end. You want to twist counter-clockwise, toward your face. Wrap the right section in on itself, just like you're making a little bun. Let some of the hair stick out, it's ok (you don't want them to look like Princess Leia buns).

4. Pin the right bun in place. I like to use these mini bobby pins, since they're easier to hide and they're coated in rubber so they hold your hair better.

5. Next, twist the middle section clockwise and pin. Then twist the left section clockwise and pin.

6. Spray the three buns with a little more hairspray, and you're done!

See? Super simple!
Here's the look, feminine and easy breezy. What do you think, my darlings? Thank you so much, Caroline and Jamie! xoxoxo

P.S. Past hair tutorials, including the perfect side ponytail and braided top bun.

(Photos by the fabulous Jamie Beck. Caroline's shirt is from Cardigan, and her lipstick is Covergirl Outlast Lipstain in Wild Berry)

Rabu, 09 Februari 2011

Messy side ponytail

My lovelies, you know the messy side ponytail from J. Crew's spring lookbook? Well, I really wanted to learn how to do it myself, so I invited over my friend Caroline (who is a hair genius) to explain how to get the look, and the fabulous Jamie Beck took a few photographs. (What I love love love about this style is how the top looks like a beehive!)

Here are Caroline's steps, if you'd like to try it out....
1. Start with day-old hair...meaning it's been a day since you've washed it. (If you must wash your hair, then use a volumizing spray to add oomf; and if your hair is oily, use a French dry shampoo to build body and texture.) Now make a deep side part on one side of your hair. You can use a rat-tail comb to get an extra straight part.

2. Backcomb the top quarter of your hair. Basically, brush the hair downwards toward your scalp so it's sort of frizzy and can stand on its own.

3. Gently brush the very top layer of your hair to make it smooth on the top. That way, all the backcombing will be hidden under the layer that you brushed. Still, don't brush too much, you want it a little messy.

4. Take the entire backcombed section and pin it behind your head. To make it secure, place the bobby pins in an "X."

5. Now take all your hair and put it in a low ponytail at the nape of your neck. Tighten the rubber band as tight as you can. This will help "push" your hair up, creating more volume at the top.

5. You can either leave the rubber band exposed, or hide it by taking a small half-inch section of hair from the ponytail and wrapping it around the rubber band. Take a small bobby pin and pin the hair to the rubber band.

6. Rough up the ponytail with your fingers to match the texture at the top of your hair. Use the same motion as you did to back comb, but use your fingers instead, since this will create a messy texture but will be softer and gentler than using a comb. Remember, this look isn't about perfection; it looks best slightly messy.

Let's do it! Thank you so much, Jamie and Caroline! xoxo

(Photos by the wonderful Jamie Beck)

Senin, 21 Maret 2011

Braided top bun

Whenever I'm walking around downtown New York, I see tons of cute girls wearing buns on the tops of their heads. Well, what could be even better than a top bun? A braided top bun! My friend Caroline, a hair genius, came over to explain exactly how to get this easy spring look, and the fabulous Jamie Beck took photos.

Here are Caroline's easy steps...
1. This simple hairstyle is perfect for a warm spring day, when you want to keep your hair cool and off your neck. First, part your hair in a deep side part (instead of combing it back smoothly). This makes it look a little less fancy, perfect for bike rides or Sunday picnics. Then gather your hair into a ponytail on top of your head. The higher, the better.

2. Make a loose braid all the way down the tail. Don't braid it too tightly; a little messy is perfect and it will help it look less "ballerina." Secure the end with a rubber band; I recommend these clear elastic bands, since they'll blend into your hair color and won't be as visible.

3. Creating a circle on top of your head with the braid. You don't want to wrap it tightly like a bun; instead you want it loose and open in the center, kind of like a braided pillbox hat! (If your hair is really long, you may have to double up the braid, one in front of the other.) When you reach the end, tuck the bottom of the braid under the circle you've created to hide it.

4. Pin the braid in place with mini bobby pins, since they're easier to hide and won't be as noticeable.

5. A few suggestions: I like to make the look a little messier by pulling little strands of hair out at the back and sides, but if you prefer it cleaner, you don't have to do that. And if you'd like, you can pin your bangs out of the way with bobby pins.
Voila! Here's the look, beautiful and timeless. What do you think, my darlings? Thank you so much, Caroline and Jamie! xoxo

P.S. Past hair tutorials, including three twisted buns, the perfect side ponytail, a messy French bun.

(Photos by Jamie Beck for Cup of Jo. Caroline's shirt is from Cardigan, her jewelry is from her own line Brvtvs, and her blush is Tarte cheek stain in Tickled.)

Kamis, 05 Mei 2011

A braided crown

I'm excited to share another hair tutorial! Heidi braids, which go across the top of your head, are beautiful, but my friend Caroline wears hers in a different way: like a crown circling around her head. What a breezy summer style! She looks like a Danish princess. So I invited her over to explain how to do them, and the wonderful Jamie Beck took photographs.

Here are Caroline's steps, if you'd like to try it out...
1. First, part your hair into two sections. To make the look softer, I like to make a diagonal part in the front (starting sort of near the arch of my left eyebrow, going towards the middle of the crown) and then bring the part straight down the back.

2. Braid the two ponytails, and secure each with a small rubber band.

3. Make sure the tops of the braids are pretty loose (you don't want that part pulled too tight or you'll be able to see the part line going down the back).

4. Take the braid on the right and wrap it around the front. Wrap it low and loose near your front hairline (versus on the top of your head).

5. Pin the braid in place with bobby pins. I like to use mini ones, but if you have thick or unruly hair, bigger pins will work better.

6. Take the second braid and wrap it around the back. Again, I like to keep it low and loose so it sort of flows into the front braid.

7. Pin in place. If your hair is long enough, tuck the end of each braids behind the other braid (right where they meet) and pin to hold. Voila!
What do you think, my darlings? These pretty braids are perfect for summer bike rides and taking photos around town. (Your hair stays out of your face, but you still look adorable.) Thank you so much, Caroline and Jamie. xoxo

P.S. Three past hair tutorials, including the perfect ponytail!

(Photos by the fabulous Jamie Beck for Cup of Jo. Caroline's jewelry is from her own line Brvtvs, and her lip color is NARS lipstick in Niagara. She also used this hairspray to make her hair shiny.)

Selasa, 12 April 2011

Stinky cheeses: How brave are you?

My sweets, a couple weeks ago, we figured out how to make the perfect cheese plate. But what about really those change-your-life strong cheeses? Well, Murray's Cheese helped us put together a cheese plate for brave souls that will blow your mind (and stink up your living room). The only question is: Can you handle it? :)

Murray's head cheesemonger Sydney Willcox showed us how to create a truly adventurous cheese plate, and the wonderful Jamie Beck took photos. Here goes...
Overall rule of thumb: Typically it's OK to eat the rind of any cheese, as long as you can handle the stronger flavor (exceptions, of course, are cloth-bound or wax rinds).

Monte Enebro. This quirky Spanish goat cheese is covered in ash and mold. The flavor is creamy and salty on the inside, and then gets spicy, damp and acidic as you get toward the rind. Its overall funny appearance is said to resemble the leg of a mule!

Quadrello di Bufala. This gamey cheese is made in northern Italy with water buffalo milk. Two SUPER cool brothers took over their father's farm (their dad had started the farm in 1968 and tragically died the same year). They wanted to do more than just make mozzarella, so they created a bunch of different funky cheeses. This cheese is very barnyard-y; you can taste wet straw, a bit of stink and sweetness at the same time. Tangy, meaty, very rich. Washed in brine.

Epoisses. There are two ways to serve this runny cow's milk cheese--cut it like a pizza or cut the top off and scoop it out with a spoon (or dip your bread in!). After four weeks of aging in France, this cheese is rinsed in French brandy--and once it crosses the pond, Murray's washes it in brandy again in their cheese cave to kick up the intensity. Very strong, gooey, stinky. (In fact, it's so stinky that there's a rumor that it's banned from French public transportation.) Like a salty pudding. Fun fact: Napoleon Bonaparte was a huge fan!

Pecorino Foglie de Noce. This raw sheep's milk cheese is buried in barrels full of walnut leaves while it ages. You can taste the walnut flavor in the cheese, and the rind is grassy and herbaceous. Milky, nutty, sharp and very salty. Great with fresh grapes, since it's so salty that you need that refreshing palate cleanser. (Fun fact: Did you know that the word "pecorino" doesn't actually connote a specific cheese, but simply refers to any Italian sheep's milk cheese?)

Caveman Blue. This blue cheese is made with raw cow's milk in Oregon. (The Pacific Northwest is a big blue hotspot.) Really fruity and spicy, the flavor is right up front. Has nuances of beef and bacon and grass. Not for people who are timid about blue cheeses! The name "Caveman Blue" is a nod to the nearby town of Grant's Pass, which is overlooked by a huge hulking statue of a caveman.

Yum! Thank you so much, Sydney and Murray's! What do you think, my lovelies? Do you dare? How bold are you when it comes to cheeses? (I would love to serve this tray at a dinner party!)

P.S. Remember Toby's stinker shirt? :) And more cheese-y posts!

(Photos by the amazing Jamie Beck for Cup of Jo)

Rabu, 30 Maret 2011

A handy guide to creating the perfect cheese plate

I may or may not be obsessed with cheese (are you, too?), so the fact that we live down the street from Murray's Cheese, the most amazing cheese shop that ever existed, is fabulous and a little dangerous. The shop is packed with incredible cheeses, meats, chocolates, breads and ice creams, and the cheesemongers are geniuses (and give samples!). Toby and I venture over there at least twice a week, and we're both fatter and happier for it.

So, my darlings, I'm thrilled to present this handy guide to creating the perfect cheese plate! I met with Murray's head cheesemonger Sydney Willcox to discover her tried-and-true tips, and the lovely Jamie Beck took photos. Here goes...
Overall pointers for putting together a cheese plate:
* When you invite friends over, buy one ounce per person per cheese; and stick to five to six cheeses total.
* Choose a fun variety of cheeses: different textures, countries, and all three milk types (goat, sheep, cow).
* Serve all the cheeses on one big board. You want your guests to start with the mildest and work up to the strongest, so place the cheeses in "clock order"--12 o'clock being the mildest and 11 o'clock being the strongest.
* Take the cheese out of the fridge at least an hour before serving. Cheese should be eaten at room temperature, when it's at its full flavor and texture.
* Put out a few different knives. Goat and blue cheeses crumble if you use a regular knife, so cheese wires are the best thing to use--if you don't have one, you can use dental floss! Softer cheeses work best with a butter knife. Harder cheeses, like parmesan, are good with a triangle-shaped knife. Cut circular cheeses in wedges, like a pizza.
* If you have leftovers, don't store the cheese in Saran Wrap, which will make the cheese sweat and leave a plastic-y taste. Cheese is living and needs to breathe, so wrap it in parchment or wax paper, and keep it in the most humid part of the fridge (usually the vegetable drawer).
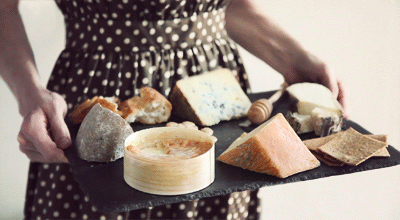
Six cheeses for the perfect basic cheese plate:
(pictured clockwise from top)

1. Cremont is a bloomy, rindy, mild cheese, which debuted last year in Vermont. (The name "cremont" is a mix of "cream" and "Vermont"!) The cheese has both cow and goat milk. Luscious, coats your tongue, fudge-y, cake-y.

2. La Tur is the little black dress of cheeses! Everyone loves it. It's a mix of goat, sheep and cow--which is is pretty unusual. Flavorwise, you get a hint of all three animals--tang from the goat, lingering buttery fat from the sheep, milky sweetness from the cow. The texture feels almost whipped, like savory ice cream! At a party, this insanely popular Italian cheese will disappear first.

3. Pyrenees Brebis. Every single person I've has ever met loves this sheep's milk cheese. It's a huge crowd-pleaser. A lot of flavor, but very harmonious. Nutty, salty, floral, semi-soft. From the southwest region of France, where there are huge herds of sheep.

4. Cabot Clothbound Cheddar. Cabot makes lots of cheddars, but this is their artisanal (read: fancy!) line. What's cool about this cheese is that it's a partnership between Cabot and the Cellars at Jasper Hill--Cabot makes the cheese, which is then aged in the Cellars at Jasper Hill. There's actually a staff of guys (football-player size!) who flip these cheeses everyday, so they'll age evenly. The cheese is wrapped in cloth, which is a more English style of making cheese. Super strong cheddar; you get little crystals. You'll taste peanuts, caramel, earthy flavors. Eat from the inside out; then take the cloth off and then eat the rind--it almost takes like dirt, but it works so well with the other flavors. (P.S. It would make the best grilled cheese you'd ever have in your life.)

5. Pleasant Ridge Reserve. Made with raw Jersey cow's milk in Wisconsin. Very fruity and smooth. The American Cheese Society just named it "Best in Show" for the third time (it's the only cheese to have been awarded Best in Show more than once!). You've gotta try it.

6. Cambozola Black Label is a very, very delicate blue cheese. Just a tinge of that mineral flavor; very buttery with a bit of a cashew flavor. A great beginning cheese for people who think they might not like blue cheeses. (Once you put it on bread and add a grape, it will mellow out, if you’re feeling timid!) Blue cheeses and chocolate also go together really well--a great balance of salty and sweet.

Pair cheeses with: Dried cherries, walnuts, marcona almonds (I love these!), fresh grapes, crackers and French bread.
Yummy! Thank you so much, Sydney and Murray's! Have you tried any of these cheeses before? Do you have a different favorite cheese that you'd recommend? I'd love to hear...

P.S. More cheese-y posts!

(Photos by Jamie Beck for Cup of Jo)

Kamis, 28 April 2011

Cheese pairings

My lovelies, here's our third (and final) cheese tutorial! If you're planning a romantic night at home, or a fun evening with friends, here are three cheese + drink pairings that will knock your socks off...
The stinky French cow's milk cheese Langres comes in a wooden container. The traditional way to eat it is to pour Champagne into the little dip (or "fountain") on the top of the cheese -- which makes it effervescent and delicious! (Confession: We used Prosecco to save some coin, but it was still fabulous.)
There are two types of people in the world: Those who love smoky flavors, and those who hate them. (Which are you?) This smoked goat cheese, Up in Smoke, packs a major punch--and almost tastes like bacon! The award-winning cheese is bright, tangy and smoky, since it's wrapped in smoked maple leaves spritzed with bourbon. Double the intensity by pairing it with a really smoky beer. (Alex was obsessed with this combo.)
I never drink coffee (which is ironic considering my blog's name), but I made an exception for this amazing cheese. Barely Buzzed is a cheddar-style cheese made by two brothers-in-law in Utah, and the rind is rubbed with espresso coffee grounds and lavender. The flavors permeate the milky cheese--it's incredible. Barely Buzzed won a Blue Ribbon at the American Cheese Society three years in a row. Pair it with a strong cup of coffee for a taste explosion...and a serious spring in your step. :)

What do you think? Which would you go for?

P.S. More cheese-y posts!

(Recommendations from Murray's Cheese. Photos by the amazing Jamie Beck for Cup of Jo)

LinkWithin

'